Thursday, November 14, 2013

Homemade Seasoning Salt

I don't use a lot of seasoning salt when cooking, but when I found this recipe for homemade seasoning salt, I thought it would be a good seasoning to have on hand. 

And, of course, after I mixed some up, I had to try it out, so I used it on some of our grain-fed, all-natural beef. It tastes just like the seasoning salt from the store, minus all the preservatives. Yummy!

The recipe makes a lot, so it's a great value too!


Homemade Seasoning Salt
From Budget Savvy Diva

1/3 cup table salt
2 tablespoons white sugar
2 teaspoons paprika
1 teaspoon garlic powder
1 1/2 teaspoons onion powder
1/2 teaspoon ground pepper
1/2 teaspoon ground turmeric
Pinch of cayenne pepper
1/4 teaspoon of red pepper flakes (optional)

Mix altogether and store in an airtight bag or spice jar. 

Tuesday, November 12, 2013

Repurposing Old Windows, Part Deux

Found another huge window that I wasn't sure what I would use it for since it was so big, but it was only $5 so I couldn't resist. After bringing it home and having it sit in my garage for several weeks, I decided I would use to dress up my fireplace mantel. Previously, I just had the star hanging up on the wall, but I think adding the star behind it gives the mantel more dimension and interest. Plus, I think it looks rustic and Americana and super cute :) When hanging old windows, especially large ones, be sure to use drywall anchors and heavy duty picture frame hooks.

Monday, November 11, 2013

Parmesan and Spinach Orzo

This was a cozy and comforting dish that was easy to prepare. It was a little bland, but I think adding an extra clove or two of garlic, as well as some more parm cheese would fix that. You could easily double the recipe and freeze the extras. 

Parmesan and Spinach Orzo
Adapted from Life is a Strawberry

2 and 1/2 cups whole wheat orzo
2 Tbsp. Extra Virgin Olive Oil
2 green onions, chopped
1 clove garlic, minced
salt and pepper to taste
2 tsp. flour
1 cup milk 

1 package frozen spinach, defrosted, water wrung out and chopped
1/2 cup parmesan cheese, shredded, plus extra for garnish

Cook orzo according to package directions. Set aside. Heat olive oil in a medium-sized pot over medium heat. Add onions, garlic, salt and pepper and saute for 1 minute or until onions are translucent. Add flour to form a roux and cook for an additional minute. Add about 1/4 cup of the milk to the pot and whisk to work out any lumps from the roux. When lumps are worked out, add the remaining milk and whisk to combine. Bring to a simmer and cook until sauce has thickened, about 8 minutes. Add chopped spinach to sauce and cook an additional 2 minutes or until spinach has cooked down. Remove sauce from heat. Stir parmesan cheese into sauce. When cheese has melted, add cooked orzo to sauce and toss to coat. Garnish with extra parmesan cheese and serve immediately.


Thursday, November 7, 2013

Momma's Day Out at the Salon All-Natural Style

Yes, I know this is a blog about clean EATING, but as I've learned lately, it's not just about what you put in your mouth, it's about what you put on your body as well. Anything we put on our body, from cosmetics to lotions to hair care, can be absorbed through the skin and affect us just as if we ate it. For example, if you're trying to eat gluten-free, check your lotions because many include gluten (yes really!) and every time you slather some on, your introducing gluten into your system.

So, on that note, I've decided to explore all-natural and clean beauty and health care products. If you have any suggestions on all-natural products you love, please let me know!
 

I decided to start my health and beauty product search at the salon. I was overdue for a hair cut and color and found a salon in Carmel (Tricology Salon) that uses all organic products, from the hair color to the products. From their website..."The Trichology Design Team is committed to the most advanced natural, organic, safe and effective hair and beauty products." So I made an appointment with Alex and set out for a day of (overdue) pampering. 

The experience was great! The salon is super clean, spa-like and relaxing and I loved all the different products Alex used. They all smelled great and made my hair look like a million bucks. Alex also did an amazing job on my cut and color. The highlights were the best I've ever had and my cut is so flattering. Plus, she offered me lots of tips and tricks for doing my hair at home as she was going along. She really listened to what I wanted and I am over-the-moon over my new look. I also appreciated that all the products were natural and safe, and they were still able to give me the look I want.


Wednesday, November 6, 2013

Potato-Crusted Pork Chops

This meal was all my hubby, so I don't have a whole lot of input :) He said the recipe was pretty involved prep-wise, but the chops turned out great. Very flavorful and moist, they almost tasted like the famous Indiana pork tenderloin.

Potato-Crusted Pork Chops
Adapted from Rachael Ray Mag

3 eggs
1/4 cup flour
Salt and pepper
2 pounds baking potatoes
1 pound boneless pork loin, sliced into 4 cutlets pounded 1/4-inch thick
1/2 cup vegetable oil


In a shallow bowl, beat the eggs with a fork. In a second bowl, mix the flour with 1/4 tsp. each salt and pepper. Using a box grater or a food processor with a shredding disk, shred the potatoes. working in four batches, wrap the potatoes in a clean kitchen towel and squeeze out as much moisture as possible; transfer to a large bowl. Season with 1 tsp. salt and 1/4 tsp. pepper.
 

Working with one cutlet at a time, dredge in the flour, shake off excess, dip in the egg, then press the shredded potato onto both sides of the cutlet to coat. Repeat with remaining cutlets.
 

In a large, heavy skillet, heat the oil over medium-high. Fry 2 cutlets, turning once, until the potatoes are crispy and brown, about 8 minutes. Drain the cutlets on paper towels and tent with foil to keep warm. Repeat with the remaining 2 cutlets.


Tuesday, November 5, 2013

Inexpensive Subway Art


I've always been a little afraid of wall art for my home. Aside from family pictures, I never know what to hang up on the walls. Plus, seems like most wall hangings, especially the ones I love, are expensive. Thank you Pinterest, once again, for showing me the light and giving me ideas for some money saving DIY wall art. The first wall art I tackled was the phonetic alphabet for G's room. His room is all aviation and airplanes and so when I saw the Pinterest one (on the left) I knew I wanted something similar. The secret to making this DIY subway art affordable is using Staples' option for engineering prints. At $1.99 for a 2x3 print, it's a steal. Mind you, the engineering prints only come in black and white, but that's perfect for the subway art look. 

For the airplane and phonetic alphabet, I found a black outline of an old looking airplane on Google, copy and pasted it into Publisher and then added the words in white on top of it. Whatever design or wording you do, make the background black and the wording white. Save as a JPG file, upload to Staples and order an engineering print. I then cut out the airplane (because the background of it was white, I wanted grey) and used double-sided tape to adhere to a piece of grey poster board. The frame was $5.99 from Goodwill (I sanded down the ugly brown and spray painted black). Cut the poster board to size to fit the frame, add to the frame and there you have it. Instant subway art for under $10. 

The second piece is subway art using lyrics to one of my favorite Mumford and Sons' songs, "After the Storm." I did the basically the same thing; in Publisher, I created a document with a black background and overlaid it with the words in white. I played with the fonts, changing them up line by line to give it that full subway art look. I saved it as a JPEG, uploaded to Staples and ordered as an engineering print. I then took a piece of plywood, cut to the size of the print (in my case 2x3) and painted the edges of the plywood black. I then used mod podge to adhere the print to the wood and also added two layers of modge podge on top of the print. I took a fine sand paper and very lightly sanded over the whole thing to give it a rustic, vintage look. With the print, mod podge and plywood, this one cost under $10 as well.

You can find full directions on DIY subway art at I Am Momma Hear Me Roar.


Monday, November 4, 2013

Zucchini Pizza Crust


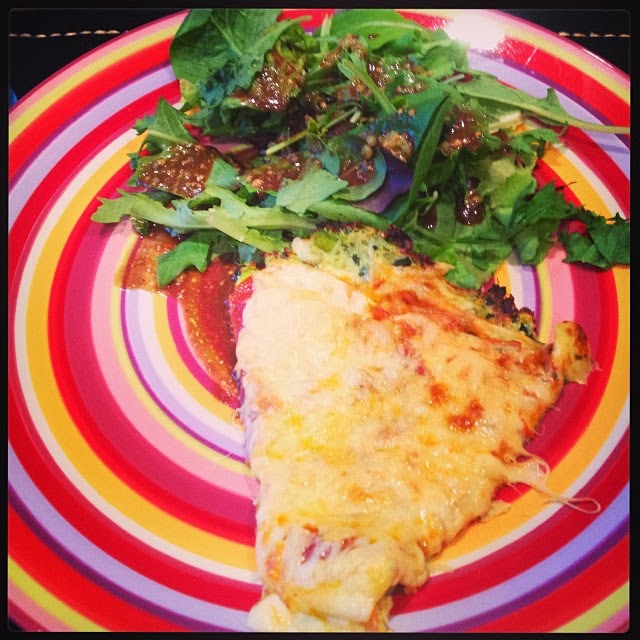
I had pinned a recipe for cauliflower pizza crusts, but had put off trying it because I'm not a big cooked cauliflower fan. Then I found this recipe for zucchini pizza crusts and since I like zucchini and I froze a ton from our garden this summer, I opted to try this one instead. 

Honestly, I was very leery that it wouldn't turn out (as was the hubby), but it was super good! You could taste the zucchini, but only a little bit and it gave a similar consistency to a thin crust pizza. Plus, with lots of sauce and cheese, the kids won't be any wiser ;) Definitely a keeper; I love that it's a great low-carb and veggie-full way to eat pizza. 


Zucchini Pizza Crusts
4 cups zucchini, shredded
1/2 cup mozzarella, shredded
1/4 cup parmesan cheese, grated
1 egg
1 teaspoon  oregano or Italian seasoning
salt and pepper

Microwave zucchini on high for 6 minutes, let cool and then squeeze out as much moisture as possible. Mix the zucchini, mozzarella, parmesan, egg, oregano, salt and pepper. Press the mixture onto a baking mat or parchment paper-lined baking sheet and bake at 450 F for 15-20 minutes, until lightly browned. 

Top with your favorite sauce, cheese and toppings, and bake for another 5-10 minutes until the cheese is melted.